2008/12/15

How to draw and view data when PETSc running

Example solve AX=B
vec X;
  • In source code
VecView(Vec vec,PetscViewer viewer)
VecView(X,PETSC_VIEW_STDOUT_SELF)
  • In command
VecViewFromOptions(Vec vec, char *title)
VecViewFromOptions(X,"TEST")


petscmpiexec -n 2 ./a.out -vec_view_draw -draw_pause 1
2008/12/2

How to play DOS game in linux

install dosbos
  1. uprmi dosbox
  2. dosbox (normal user)
  3. in dosbox commend terminal
  4. mount c /game-dir
  5. c:
  6. play.bat
OK!!

2008/11/27

Install MPICH2 in Mandriva 2009 single machine

  1. You will need the following prerequisites : download mpich2 from http://www.mcs.anl.gov/research/projects/mpich2/
  2. Set you environment : export CXX=icpc & export CC=icc
  3. ./configure --prefix=/home/YOU/MPICH2-install/ --enable-cxx --enable-sharedlibs=gcc
  4. make
  5. make install
  6. vi ~/.bashrc and plus "export PATH=/home/YOU/mpich2-install/bin:$PATH"
  7. touch ~/.mpd.conf
  8. touch .mpd.conf
  9. edit .mpd.conf to add line like that secretword=
It will work NOW! If your no-passwd sshd is work.
How to run a MPI program:
  1. mpd &
    mpdtrace
    mpdallexit
  2. mpdboot -n -f mpd.hosts
  3. mpd &
    mpdtrace -l
  4. mpdtrace
  5. mpdringtest 100
  6. mpiexec -n hostname
  7. mpiexec -n 2 c.out
  8. mpdallexit
Summary
  • How many processor: mpdboot -n -f mpd.hosts
  • mpd &
  • Run your parallel program: mpiexec -n 2 c.out
  • Clean mpd: mpdallexit

2008/11/26

The lastest MPICH-1 configure environment parameter

./configure --with-device=ch_p4 --with-arch=LINUX --with-mpe --enable-cxx --enable-mpedbg --enable-debug --enable-traceback -prefix=/opt/MPICH/ -c++=/opt/intel/Compiler/11.0/074/bin/ia32/icpc -cc=/opt/intel/Compiler/11.0/074/bin/ia32/icc -opt=-g -rsh=ssh

Confessions of a Linux Fan: 10 Things You Might Want To Know Before Switching Over To Linux

This article is I refer from http://thinkthick.blogspot.com/2007/07/confessions-of-linux-fan-10-things-you.html


Confessions of a Linux Fan: 10 Things You Might Want To Know Before Switching Over To Linux
1. The basic installation of most mainstream Linux distributions is very easy, but a first time user might run into trouble when trying to depart from the defaults.
2. If you want a proper Linux installation, you are going to have to mess around with the partition table.
3. You will have to learn how to use the command line.
4. All those pretty effects of wobbly windows and cube desktops require some work from the user.
5. Yes, more hardware works with Linux than with Windows. No, not all hardware works 100% like it's supposed to.
6. If you need/want to install a package not included in the repositories, or install from source, you might need to do some research.
7. Most mainstream software manufacturers forget about Linux.
8. Linux is not for the meek of heart.
9. Linux is almost entirely virus/trojan/spyware free, but you will still need some kind of protection.
10. Linux assumes that you are an intelligent person.

2008/11/25

Install Mandriva 2009

I had installed Mandriva 2009 for two days.
There are some of my thoughts:
  1. Beginning, The Mandriva 2009 will choose kernel-server-2.6.27.0
  2. After installed, Do not update anythings
  3. Put you install DVD into DVD-Rom, then update kernel to kernel-desktop-2.6.27.0 (which also support memory to 4GB). Or , suggestion, Using Easy urpmi to update to kernel-desktop-2.6.27.5. Please don't forget to install kernel source code.
  4. Type commend as root: urpmi nvidia
  5. If you are not kernel-desktop-2.6.27.5, it will update automaticly
  6. It will install x11-driver-video-nvidia-177.70, dkms-nvidia-current-177.70, nvidia-current-kernel-2.6.27.5-desktop and so on
  7. Type "XFdark" as root
  8. My video card is GeForce 9400GT, it will suggest choose "GeForce 6100 or later"
  9. Reboot, using kernel-desktop-2.6.27.5
Finished!!!!!!

2008/10/15

fstream

include
write to file:
ofstream ffile;
read file:
ifstream ffile;
open file:
ffile.open("filename");
check file:
ffile.is_open();
ffile.fail();
if(!ffile){
}
close file:
ffile.clear();
ffile.close();
ios_base:
ios::app
ios::ate
ios::binary
ios::in
ios::out
ffile.open("filename",ios::app | ios::out | ios::binary);

2008/9/25

Conditional operator <-> ternary operator

condition ? expression1 : expression2
C = A > B ? V1: V2;

if (A>B) C = V1;
elese C =V2;

2008/9/24

Distribution Data (DA)

DAGetInfo
Gets information about a given distributed array.
Synopsis
#include "petscda.h"
PetscErrorCode PETSCDM_DLLEXPORT DAGetInfo(DA da,PetscInt *dim,PetscInt *M,PetscInt *N,PetscInt *P,PetscInt *m,PetscInt *n,PetscInt *p,PetscInt *dof,PetscInt *s,DAPeriodicType *wrap,DAStencilType *st)
Input Parameter
da -the distributed array
Output Parameters
dim - dimension of the distributed array (1, 2, or 3)
M, N, P - global dimension in each direction of the array
m, n, p - corresponding number of procs in each dimension
dof - number of degrees of freedom per node
s - stencil width
wrap - type of periodicity, one of DA_NONPERIODIC, DA_XPERIODIC, DA_YPERIODIC, DA_XYPERIODIC, DA_XYZPERIODIC, DA_XZPERIODIC, DA_YZPERIODIC,DA_ZPERIODIC
st - stencil type, either DA_STENCIL_STAR or DA_STENCIL_BOX
Note
Use PETSC_NULL (PETSC_NULL_INTEGER in Fortran) in place of any output parameter that is not of interest.

DAGetCorners
Returns the global (x,y,z) indices of the lower left corner of the local region, excluding ghost points.
Synopsis
#include "petscda.h"
PetscErrorCode PETSCDM_DLLEXPORT DAGetCorners(DA da,PetscInt *x,PetscInt *y,PetscInt *z,PetscInt *m,PetscInt *n,PetscInt *p)
Input Parameter
da -the distributed array
Output Parameters
x,y,z - the corner indices (where y and z are optional; these are used for 2D and 3D problems)
m,n,p - widths in the corresponding directions (where n and p are optional; these are used for 2D and 3D problems)
Note
The corner information is independent of the number of degrees of freedom per node set with the DACreateXX() routine. Thus the x, y, z, and m, n, p can be thought of as coordinates on a logical grid, where each grid point has (potentially) several degrees of freedom. Any of y, z, n, and p can be passed in as PETSC_NULL if not needed.

2008/9/17

Data Visualizer

MayaVi
homepage: http://mayavi.sourceforge.net/index.html
  • An easy to use GUI.
  • Can be imported as a Python module from other Python programs and can also be scripted from the Python interpreter.
  • Provides modules to:
    • Visualize computational grids.
    • Visualize scalar, vector and tensor data.
  • Quite a few data filters are also provided.
  • Supports volume visualization of data via texture and ray cast mappers.
  • ParaView
    Homepage: http://www.paraview.org/New/index.html

    ParaView is an open-source, multi-platform application designed to visualize data sets of size varying from small to very large. The goals of the ParaView project include the following:

    • Develop an open-source, multi-platform visualization application.
    • Support distributed computation models to process large data sets.
    • Create an open, flexible, and intuitive user interface.
    • Develop an extensible architecture based on open standards.
    OpenDX
    Homepage: http://www.opendx.org/
    OpenDX gives you new control over your data...and new insights into their meaning. Yet OpenDX is easy to use because it lets you visualize data in ways you've never dreamed of--without getting bogged down in the technology.

    2008/9/11

    PetscBarrier

    PetscBarrier
    Blocks until this routine is executed by all processors owning the object A.
    Synopsis
    #include "petsc.h"
    PetscErrorCode PetscBarrier(PetscObject obj)
    Input Parameters
    A -PETSc object (Mat, Vec, IS, SNES etc...) Must be caste with a (PetscObject), can use PETSC_NULL (for MPI_COMM_WORLD)

    Easy usage: PetscBarrier(PETSC_NULL)

    C++ command-line arguments

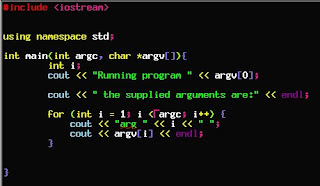
    When running a C++ program in command-line mode in Unix (e.g. telnet or dtterm session), or in MSDOS mode on Windows, you can type extra arguments following the program name. These arguments are automatically passed as string parameters to the main routine.
    For instant, if our program name is a.out, we may type in ./a.out -m 20 -n 30 -z 90 -haha happy from the terminal, and the string "may" would automatically be passed as a parameter to the main routine of our a.out program.
    To use these parameters, we must specify in our main routine what the parameter names and types are, and the format is exactly as follows:
    int main(int argc, char *argv[])
    Each argument is passed as a seperate character array, so argv[1] points to the first argument text, argv[2] points to the second argument text, etc. (argv[0] gives you the name of the executable file for the program itself)
    example
    How to execute:
    ./a.out -n 30 -m 40

    2008/9/10

    vector function in PETSc

    VecCreate
    Creates an empty vector object
    Synopsis
    #include "petscvec.h"
    VecCreate(MPI_Comm comm, Vec *vec)

    VecSetSizes
    Sets the local and global sizes, and checks to determine compatibility
    Synopsis
    #include "petscvec.h"
    PetscErrorCode PETSCVEC_DLLEXPORT VecSetSizes(Vec v, PetscInt n, PetscInt N)
    Parameter
    v-the vector
    n-localsize
    N-Globalsize

    MPI function in PETCs

    MPI_Comm_rank

    #include "mpi.h"
    int MPI_Comm_rank ( MPI_Comm comm, int *rank)
    Determines the rank of the calling process in the communicator

    2008/9/9

    Sone definition of PETSc parameter

    • PetscMPIInt = int {typedef int PetscMPIInt}
    • PetscErrorCode = int {typedef int PetscErrorCode}
    • PetscInt = int {no 64bit }
    • PetscInt = long long {64bit}
    • PetscErrorCode = int {typedef int PetscErrorCode}

    2008/9/8

    同時使用c的stdio.h和c++的iostream

    同時使用c的stdio.h和c++的iostream需要呼叫特殊的iostream函式
    ios::sync_with_stdio();

    C++除錯用cerr

    iostream 函式庫提供了cerr,讓你可以寫到標準錯誤。cerr的用法和cout非常類似,但是他並不會將輸出的data儲存在buffer。在真正顯示之前,先將所要顯示的字元儲存在buffer,這種做法可以加快顯示的速度,但是cerr並不使用這種做法,這樣才可以立刻顯示儲錯訊息。

    2008/9/2

    兩個程式檔.cpp的全域變數的宣告

    In main.cpp
    object global_value=xxx;
    int main(){
    .......
    }
    In function.cpp
    extern object global_value;
    int function(){
    }

    How to compiler PETSc's program and run

    Makefile:

    include ${PETSC_DIR}/bmake/common/base
    include ${PETSC_DIR}/bmake/common/test
    print.out: p-hellow.o
    ${CLINKER} -o print.out p-hellow.o ${PETSC_LIB}

    Note: It will find correspond file name automatically.
    For example: p-hellow.o -> p-hellow.cpp

    runfile:
    ${PETSC_DIR}/bin/petscmpiexec -np 2 ./print.out
    OR
    mpirun -np 2 ./print.out

    2008/8/31

    FreeBSD DNS - How to work

    # /etc/rc.d/named start
    # ndc start

    A DNS server in FreeBSD relies on the BIND daemon. This daemon is called 'named' for obvious reasons.

    named - the bind daemon

    ndc - name daemon control program

    /etc/namedb - directory where all the bind information resides

    /etc/namedb/named.conf - daemon configuration file

    zone files are usually contained within the /etc/namedb directory, and contain the information (query answers from your site) served by your name server.


    2008/8/28

    把mpich加入PATH

    export PATH=$PATH:/opt/mpich/bin
    export LIBRARY_PATH=$LIBRARY_PATH:/opt/mpich/include

    2008/8/22

    play rmvb file in linux

    Option 1 mplayer
    I go to mplayer homepage: http://www.mplayerhq.hu/design7/news.html
    Then download binary code. It says that move the extract file from the essential-20071007.tar.bz2 to
    /usr/lib/codecs/ or /usr/local/lib/codecs/ or /usr/lib/win32
    finally, replay mplayer. It is ok!
    However, it does not work for my OS.
    Option 2 Helix Player
    Helix Player homepage: https://player.helixcommunity.org/2007/releases/HelixPlayer/ReleaseNotes.html
    You can use urpmi helixplayer
    Or download rpm from download page
    It also does not work
    hxplay XXX.rmvb
    Option 3 RealPlayer
    http://www.real.com/linux download RealPlayer11GOLD.bin
    Then chmod 744
    RealPlayer11GOLD.bin
    ./
    RealPlayer11GOLD.bin
    realplay XXX.rmvb
    It work.

    2008/8/19

    自家網頁的認証

    當你有一個網頁裡的連結要認證實可以用這個方法:
    1. 在~/public_html建個目錄: $ mkdir ~/public_html/protect
    2. 在~/下: $ htpasswd -c ~/apache.passwd user
    3. 在~/public_html/protect/下: $ touch .htaccess
    4. vi .htaccess
    5. 加入
    AuthName "need password"
    Authtype Basic
    AuthUserFile /home/user/apache.passwd
    require valid-user

    打完收工,接著把要連結的網頁或檔案放進~/public_html/protect/
    你會發現居然要輸入user和password

    free FTP and sFTP solution in LINUX

    I suggest FileZilla. It is from the same designer of firefox.
    How to install:
    $ yum or urpmi filezilla (remember to su root)
    Homepage: http://filezilla-project.org/index.php

    linux 上的翻譯軟體

    推薦星際翻譯王(stardict),想必應該很多人應該從一些地方知道這套
    free software但是我還是簡單介紹一下好了
    You can use yum(Fedora) or urpmi(Mandriva) to simply install like that
    $ urpmi stardict
    It is very easy. Or go to Stardict homepage: http://stardict.sourceforge.net/index.php
    additionally, you can download many dictionary from homepage then
    Install Dictionaries in Linux:
    1. To download these tarball dictionaries,
    2. do this: tar -xjvf a.tar.bz2
    3. mv a /usr/share/stardict/dic
    More detail please visit 重灌狂人: http://briian.com/
    However, it operates in windows XP. You can do the same in LINUX.

    2008/7/8

    some useful physical constant

    electron mass: 9.10938188e-31 Kg
    Ar: 6.63352e-26 Kg
    Xe: 2.1801e-25 kg
    1 bar =
    750.06 Torr
    R=62.36367 L·Torr·K-1·mol-1
    =
    8.20574587 × 10⁻⁵ m3·atm·K-1·mol-1
    1 Torr = 3.21875E22 particle/m^3

    2008/6/24

    linux 如何截圖

    linux下擷取圖片的command很多
    1. import xxx.jpg
    2. ksnapshot

    2008/6/20

    ssh login no password

    • modify the /etc/ssh/sshd_conf
    RSAAuthentication yes
    PubkeyAuthentication yes
    AuthorizedKeysFile .ssh/authorized_keys
    • ssh-keygen -t rsa
    • cd $home/.ssh
    • cp  /.ssh/identity.pub  /.ssh/authorized_keys
    • restart sshd
    • ssh-agent $SHELL
      ssh-add

    2008/6/19

    vi 設定檔

    每次使用vi都會自動幫你backup也就是產生file~
    如果不需要請在$home/.vimrc
    寫入
    :set nobackup

    檔案不存在請自行touch一個

    2008/6/11

    使用CUPS設定印表機

    1. 將CPUS安裝好
    2. http://localhost:631
    3. 選印表機

    rar in linux

    1. 首先,download rarlinux
    2. tar zxvf rarlinux-x-x-x.tar
    3. unrar x 你下載的檔案.rar

    2008/6/10

    在linux上用msn

    只要用google查一下就知道大約有幾十套可以在linux上使用msn聊天的程式
    目前小弟我是用KMess(KDE)

    之前,也有用過amsn但是推薦在Fedora上或Gnome桌面使用
    或是pidgin (gaim的後來計劃)都還不錯

    Mandriva 2007 英文作業系統上audacious要顯示中文歌曲

    堅持不用中文作業系統,可是遇到中文歌曲都一直無法解決

    終於,首先KDE的相關套件全裝,然後開啟audacious的preference->playlist->character encoding
    填入 big5就可以

    網路上說法Auto character encoding 選chinese可惜英文版不能選, 只好在他下方的地方填入big5就可以了

    2008/6/8

    How to install or setup PETSc

    Environment: mpich-1.2.7p1 (/usr/opt/mpich)
    Intel MKL on Windows or Linux (/usr/opt/int/mkl)
    Assume I had install MPICH and BLAS & LAPACK.
    Therefore, if you want to install single computer PETSc without MPICH
    1. PETSC_DIR=$PWD; export PETSC_DIR
    2. ./config/configure.py --with-cc=/opt/intel/cc/10.0.14/bin/icc --with-cxx=/opt/intel/cc/10.0.14/bin/icpc --with-fc=/opt/intel/fc/10.0.14/bin/ifort --with-blas-lapack-dir=/usr/opt/intel/mkl/10.0.1.014 --with-mpi=0
    3. make all
    4. make test
    • Install PETSc with MPICH
    1. PETSC_DIR=$PWD; export PETSC_DIR
    2. ./config/configure.py --with-blas-lapack-dir=/usr/opt/intel/mkl/10.0.1.014 --with-mpi-dir=/usr/opt/mpich --with-clanguage=cxx --with-cxx=/usr/opt/mpich/bin/mpicxx
    3. make
    4. make test


    BLAS/LAPACK: these packages provide some basic numeric kernels used by PETSc.
    • /usr/lib/libblas.a,liblapack.a
    • Intel MKL on Windows or Linux
    • sunperf on solaris
    • VecLib on Macs
    • IBM ESSL
  • Alternatively one can use other externalpackages installation options like the following.
    • --with-blas-lapack-lib=libsunperf.a
    • --with-blas-lib=libblas.a --with-lapack-lib=liblapack.a
    • --with-blas-lapack-dir=opt/intel/mkl72
    If using MPICH which is already installed [perhaps using myrinet/gm] then use:
    . /config/configure.py
    --with-mpi-dir=/path-to-mpich-install

    MPICH configure

    ./configure --with-device=ch_p4 --with-mpe --enable-cxx --enable-mpedbg --enable-debug --enable-traceback -prefix=/usr/opt/mpich -c++=/opt/intel/cc/10.0.023/bin/icpc -cc=/opt/intel/cc/10.0.023/bin/icc -fc=/opt/intel/fc/10.0.023/bin/ifort -f90=/opt/intel/fc/10.0.023/bin/ifort -rsh=ssh --enable-f90modules --with-arch=LINUX

    2008/6/7

    快被氣死的Mandriva 2007 & 2008 security

    root 不能登入
    normal user 不能 reboot,poweroff 和使用 /usr/bin

    搞了半天原來是 "安全性" 調成了 High 或 Higher

    urpmi Usage

    list my configured media sources : 
    urpmq --list-media

    add any local directory I like as a package source:
    urpmi.addmedia --update "some_name" file:///some/directory/path

    automatically update everything that needs updating:
    urpmi --auto-select (note: this will NOT update your kernel!)

    detail website: http://speculation.org/garrick/urpmifaq.txt

    2008/6/6

    nvidia driver install on Mandriva 2007

    Here are the steps i used to get it working from a easy urpmi install :
    easy urpmi website: http://easyurpmi.zarb.org/
    video card : Geforce4 Magic
    ***************************************
    * Note: Do not forget installing kernel source *
    ***************************************

    1. Add urpmi media using easy urpmi
    urpmi.addmedia main http://ftp.twaren.net/Linux/Mandrake/official/2007.1/i586/media/main/release with media_info/hdlist.cz
    urpmi.addmedia --update main_updates http://ftp.twaren.net/Linux/Mandrake/official/2007.1/i586/media/main/updates with media_info/hdlist.cz
    urpmi.addmedia contrib http://ftp.twaren.net/Linux/Mandrake/official/2007.1/i586/media/contrib/release with media_info/hdlist.cz
    urpmi.addmedia --update contrib_updates http://ftp.twaren.net/Linux/Mandrake/official/2007.1/i586/media/contrib/updates with media_info/hdlist.cz
    urpmi.addmedia --update plf-free http://mdk.linux.org.tw/ftp/pub/plf/mandriva/2007.1/free/release/binary/i586/ with media_info/hdlist.cz
    urpmi.addmedia --update plf-nonfree http://mdk.linux.org.tw/ftp/pub/plf/mandriva/2007.1/non-free/release/binary/i586/ with media_info/hdlist.cz

    2. Install nvidia driver

    you can use the mandriva control centre to choose the packages

    urpmi nvidia

    Then it automatically choose
    dkms-2.0.16-1.1mdv2007.1.noarch
    dkms-minimal-2.0.16-1.1mdv2007.1.noarch
    dkms-nvidia97xx-1.0-9755.2plf2007.1.i586
    nvidia97xx-1.0-9755.2plf2007.1.i586


    3. setup nvidia driver

    After drivers are installed you can install them by typing (as root)

    XFdrake

    - now select your card - this should be done automatically but please check.
    - save settings and reboot - you may not need to but sometimes the nvidia module doesn't load until a reboot.

    4. Check nvidia 3d is working

    Test the 3D by trying to run a game/screensaver

    5. Enable XGL

    - login to MCC
    - choose hardware - configure 3D desktop effects

    you should be able to choose XGL

    - reboot and you should have a shiny 3D desktop


    NVidia drivers installation

    The thing that’s probably missing is a NVidia proprietary driver that supports the composite extension needed by Xgl (the default free driver nv unfortunately does not support it). Installing the driver in Mandriva is as easy as typing as root urpmi nvidia in the system console. If everything goes properly a table like this should appear:

    More information about nvidia-8774-4plf2007.0.x86_64 IMPORTANT NOTE: This PLF provided NVIDIA driver must be configured differently than the one available from NVIDIA, so please follow the instructions below: If you are upgrading from a Mandriva Club or PLF provided NVIDIA driver, reconfiguring is usually unnecessary.

    You can reconfigure X to use the new NVIDIA driver either automatically:

    1. Run XFdrake as root.
    2. Go to the Graphics Card list
    3. Select your card (it is usually already autoselected).
    4. Answer any questions asked and then quit.

    OR you can do it manually by editing /etc/X11/xorg.conf:

    1. Change the Driver to "nvidia" in the Device section.
    2. Remove any Load "glx" lines from the Module section.
    3. Add the following line to the Module section: Load "/usr/lib64/xorg/modules/extensions/nvidia/libglx.so"
    4. Run "update-alternatives --config gl_conf" and select nvidia.conf.

    So, now all we need to do is to follow the instructions provided by the manufacturer. I used a text editor called VIM, so I typed vim /etc/X11/xorg.conf and applied the suggestions above.


    2008/6/5

    ATi and nvidia dirver 在mandriva的安裝

    free版本請從PLF安裝
    先用easy urpmi加入plf站台
    再登入root,使用urpmi
    nvidia 或 urpmi ati

    Easy urpmi: 加入更多套件來源

    Mandrake 的控制中心 (Mandrake Control Center,以下簡稱 MCC)裡可以用媒體管理員管理不同媒體來源,有時 Mandriva DVD缺套件,會導致某些軟體不能安裝。要解決這個問題,可以在MCC 加入更多套件來源,比如說PLF (http://plf.zarb.org/~nanardon/)。PLF 全名是 Penguin Liberation Front,它收藏了很多因為種種問題而無法令 Mandrake 無法直接包括在內的軟體,例如各種P2P軟體、freeware (免費但不是開放原碼/或加發佈上的限制,例如不許加入 Linux發行版本出售)、含有有專利的東西 (mp3, 跟許多多媒體編碼都是例子)。

    要指定加入套件來源的地址,用指令會比用進入MCC圖形介面更加容易。PLF的網站有一個介面叫 Easy urpmi,可以把你準備加入的站台的程序指令以文字形式顯示出來,只要以 root 身份把它給你的一行行指令用老鼠剪貼到到終端機去執行就可以了。

    以 MDV2008 比方來說,通常先把 DVD 或 CD 媒體 的"啟用"取消(MCC 下執行,或終端機下執行urpmi.removemedia -a) 後,用喜歡的瀏覽器 (如mozilla-firefox)開啟 easyurpmi.zarb.org 網址 ,它會問你一些問題,然後會給你要用到的指令

    1.在網頁第一個步驟 (Select your system) 中指定使用版本,機種,跟管理機制,比如Mandriva 2008.0 ,x86_64 (表示AMD 的 64 bit,跟Intel 的 64bit, i586 都不一樣),跟 urpmi,及要不要 Select the mirror separately for every source 。然後按 "proceed to step 2"。

    2. 指定站台地址: main、contrib 和 update 的 mirror 站台地址。Main 是正式支援的自由軟體套件,有些非自由軟體會放到 non-free下,contrib 是其它人協助包裝但沒有正式支援的,對這三者而言: XXX_update 是發行後更新套件,XXX_backport 是半官方版本更新套件(有相容風險)。有裝 YYY 來源的話,YYY_update 最好也加入。以新增Main媒體為例,就把mirror 站下拉選成喜歡的(如twaren.net ),然後打勾。PLF 這是 PLF 自己的套件的 mirror 站台地址。

    最後按 proceed to step 3。

    3.以 root 用老鼠剪貼它顯示的指令到到終端機去執行,以新增Main媒體為例,如下:

    urpmi.addmedia --update main_updates http://ftp.twaren.net/Linux/Mandrake/official/2008.0/x86_64/media/main/updates with media_info/hdlist.cz

    要是 64 bit 環境要混用 i586套件,只要回到步驟一把架構換成 i586,重複加入更多的套件來源即可。這樣就可以在圖形介面 (rpmdrake) 或文字模式介面 (urpmi) 中選取安裝喜歡的軟件了。

    使用管理


    裝好後後可以用

    • urpmq 套件名稱
      查詢是否已安裝某個套件。
      -p 查詢還沒安裝套件檔案的資訊
      -i 顯示套件的功用資訊
      -l 列出包含了那些檔案
      -a 列出系統內所有的套件
      分頁輸出用rpm -qa | less
    • urpmi 套件名稱
      來安裝你想要的套件,
    • urpmf 檔案名稱
      可以查詢某個檔案是在那個套件裡面。
    • urpme 檔案名稱
      移除某個套件


    即使在文字模式介面下,只要套件來源設好,要是需要安裝相依套件,urpmi也 會警告套件相依,在使用者同意後自行滿足安裝相依,十分方便。

    安裝更新管理


    新版在軟體有更新時,在gnome 工具列上也會提醒安裝更新。可以自行參考 /etc/urpmi/urpmi.cfg 的格式修改設定自動更新安裝。往後定期跑 urpmi.update -a 更新所有媒體資訊,文字模式介面下,每天也只要執行
    urpmi --auto-select --media updates
    就可以很簡單完成重大更新安裝。

    不過有時候mirror 站會出問題卡住(其他如Ubuntu 也會),還是不建議完全倚賴用自動更新。

    相依(dependency)問題


    想把其他家的 RPM 套件裝到 Mandriva 上經常可能會遇到相依問題, 特別是出現 "找不到某某 .so 檔" ( shared objects: 動態聯結程式庫,) 之類的錯誤訊息。可能要到sophie/rpmfind 網上搜尋那個套件裡面提供欠缺的 .so程式庫,。 找不到同樣版本的話,有時到 /lib 或 /lib64 下建立 symbolic link 欺騙系統也許能成功。如
    ln -s 某某.so.現有版 某某.so.需要版
    不過32 位元 跟 64 位元程式庫通常是無法互用的。

    Reference: Shelandy